Nahrávání...
HOPE VALLEY CLOUD logo HOPE VALLEY CLOUD logo HOPE VALLEY CLOUD logo HOPE VALLEY CLOUD logo
News:
Welcome to Hope Valley!
Čeština
  • العربية
  • Azerbaijani
  • Català
  • 中文
  • Hrvatski
  • Čeština
  • Dansk
  • Nederlands
  • English
  • Estonian
  • Persian
  • Français
  • Deutsch
  • עברית
  • Magyar
  • Italiano
  • Macedonian
  • Norwegian
  • Português
  • Português
  • Română
  • Русский
  • Español
  • Svenska
  • Türkçe
  • Українська
  • 0
    Registrace Účet
    ExtendReduce
    Domů
    Store
    Browse All ----- Shared Hosting Registrace nové domény Převod domén k nám
    Oznámení Databáze řešení Stav systému Obchodní zástupci Kontaktujte nás
    Přihlášení klienta
    Databáze řešení
    1. Portal Home
    2. Databáze řešení
    3. Virtualizor
    4. Virtualizor VPS Management
    5. How to Delete the Self-Shutdown Timer in Virtualizor
    Kategorie
    • Backup/Restore
      4
    • Cloudflare (cPanel)
      9
    • CloudLinux (cPanel)
      10
    • cPanel - Control Panel
      24
    • Databases
      11
    • DirectAdmin
      48
    • DNS - Nameservers
      6
    • Domain Management
      10
    • Email
      17
    • FTP
      9
    • Installing a Control Panel
      6
    • Mail Filters & SPAM
      8
    • Mobile
      11
    • Others
      3
    • PayPal
      7
    • Plesk
      47
    • Security
      10
    • SiteWorx (Control Panel)
      58
    • Softaculous
      69
    • SolusVM
      18
    • SSL
      5
    • Virtualizor
      19
    • WHM
      18
    • WordPress
      17
    Podpora
    • Moje support tickety
    • Oznámení
    • Databáze řešení
    • Soubory pro stažení
    • Stav systému
    • Otevřít ticket
    How to Delete the Self-Shutdown Timer in Virtualizor
    Print


    You can remove the self-shutdown timer in Virtualizor. Please, follow the steps below to remove the self-shutdown timer.


    1. Log in to your Virtualizor Control Panel.

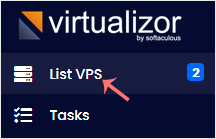
    2. From the left side panel, click on List VPS.
     

    3. Hover your mouse on the appropriate VPS, and that line will be highlighted. Then click on the Manage icon in the highlighted line.


    4. Click on the Self Shut Down.


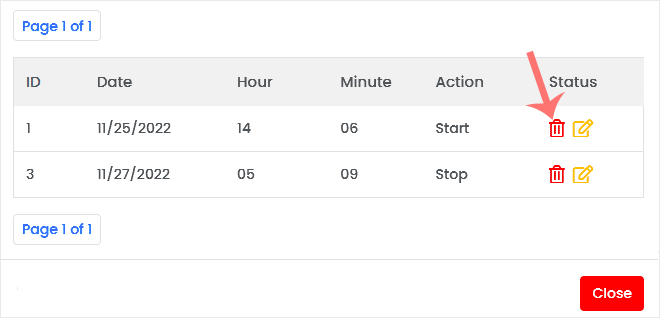
    5. If you have multiple timers, hover your mouse on the appropriate one, and that line will be highlighted. Then click the Delete button in the highlighted line.
     

    6. When asked, confirm with OK.


    Byla tato odpověď nápomocná?

    0 Uživatelům pomohlo (0 Hlasů)

    Související články

    Nejpopulárnější

    How to Enable Disable APIC, ACPI, VNC in Virtualizor

      Virtualizor allows you to enable or disable VNC, APIC, and ACPI.   1. Log in to your...

    How to Change Hostname in Virtualizor

      You can change the hostname in Virtualizor.   1. Log in to your Virtualizor Control Panel....

    How to Change the VNC Password in Virtualizor

      You can change the VNC password using Virtualizor.   1. Log in to your Virtualizor Control...

    How to Edit the Self-Shutdown Timer in Virtualizor

      You can easily edit the self-shutdown timer in Virtualizor. Please, follow the steps below to...

    How to Start VPS in Rescue Mode Using Virtualizer

      Rescue mode can be used for data recovery, OS repair, etc. You can enable rescue mode on your...

    Copyright © 2025 HOPE VALLEY CLOUD. All Rights Reserved.
    Nahrávání...
    Nahrávání...
    Choose language
    العربية
    Azerbaijani
    Català
    中文
    Hrvatski
    Čeština
    Dansk
    Nederlands
    English
    Estonian
    Persian
    Français
    Deutsch
    עברית
    Magyar
    Italiano
    Macedonian
    Norwegian
    Português
    Português
    Română
    Русский
    Español
    Svenska
    Türkçe
    Українська

    Výběr měny

    $ USD
    € EUR

    Generate Password

    Please enter a number between 8 and 64 for the password length