Indlæser…
HOPE VALLEY CLOUD logo HOPE VALLEY CLOUD logo HOPE VALLEY CLOUD logo HOPE VALLEY CLOUD logo
Nyheder:
Welcome to Hope Valley!
Dansk
  • العربية
  • Azerbaijani
  • Català
  • 中文
  • Hrvatski
  • Čeština
  • Dansk
  • Nederlands
  • English
  • Estonian
  • Persian
  • Français
  • Deutsch
  • עברית
  • Magyar
  • Italiano
  • Macedonian
  • Norwegian
  • Português
  • Português
  • Română
  • Русский
  • Español
  • Svenska
  • Türkçe
  • Українська
  • 0
    Registrer Konto
    ExtendReduce
    Kundeside
    Store
    Browse All ----- Shared Hosting Registrer et nyt domæne Overfør domæne til os
    Annonceringer Vidensdatabase Netværksstatus Partnere Kontakt os
    Kunde login
    Vidensdatabase
    1. Support
    2. Vidensdatabase
    3. Installing a Control Panel
    4. How to Install Plesk Onyx on Linux
    Kategorier
    • Backup/Restore
      4
    • Cloudflare (cPanel)
      9
    • CloudLinux (cPanel)
      10
    • cPanel - Control Panel
      24
    • Databases
      11
    • DirectAdmin
      48
    • DNS - Nameservers
      6
    • Domain Management
      10
    • Email
      17
    • FTP
      9
    • Installing a Control Panel
      6
    • Mail Filters & SPAM
      8
    • Mobile
      11
    • Others
      3
    • PayPal
      7
    • Plesk
      47
    • Security
      10
    • SiteWorx (Control Panel)
      58
    • Softaculous
      69
    • SolusVM
      18
    • SSL
      5
    • Virtualizor
      19
    • WHM
      18
    • WordPress
      17
    Support
    • Mine support sager
    • Annonceringer
    • Vidensdatabase
    • Downloads
    • Netværksstatus
    • Ny Sag
    How to Install Plesk Onyx on Linux
    Print

    Plesk is a popular website control panel. It makes managing your website easy. Although it is easy to install, going through our tutorial will be very helpful and most likely save you time.

    Before proceeding with the installation, we recommend using the correct hostname.


    What are the requirements?
    - Fresh Ubuntu, RockyLinux, or AlmaLinux OS installed on your VPS/Server.


    How to install Plesk Onyx?

    Step 1:
    Log in to your server via an SSH Client with root permissions.

    Then enter this command:

    sh <(curl https://autoinstall.plesk.com/one-click-installer || wget -O - https://autoinstall.plesk.com/one-click-installer)


    The installation will begin and may take between 20 and 30 minutes. If it shows a hostname-related error, do not quit the installation. Sometimes Plesk only shows warnings and provides you with instructions on how to resolve them.


    Once Plesk is installed, it will display a congratulatory message within your Plesk control panel and present you with an URL.
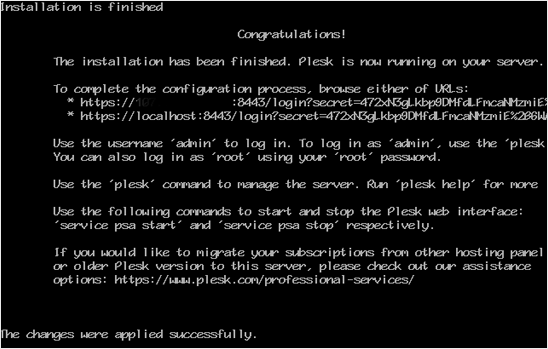
    Please copy the entire URL provided by Plesk and open it in the browser. If the URL does not work, open a port in your firewall. You can check it by disabling the firewall and then accessing the URL. If it works, it means you would need to open a Plesk port in the firewall.


    Step 2: When asked to accept cookies, do so and enter your name and email address in Contact Information.
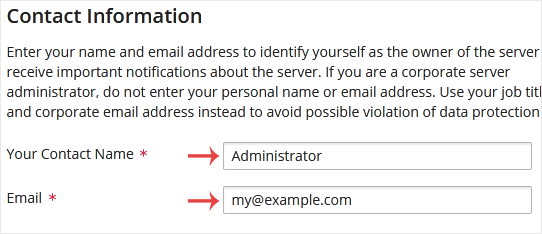


    Step 3: Scroll down to the bottom of the page, and under the password field, enter the password or generate a new one now. However, make sure that you store it in a safe place.


    Step 4: Under the License section, should you have a license key, enter your Plesk Onyx license key or use a trial license by selecting a full-featured trial license.
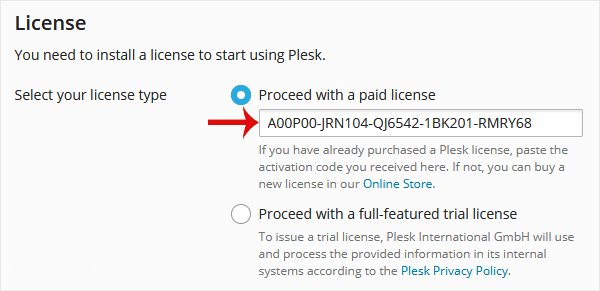
     

    Final Step: Scroll down to the end of the page, read and accept the End-User License Agreement. Click on Enter Plesk.


    Congratulations, you have successfully installed Plesk Onyx. You can now access your Plesk administrator area using root login details or the admin user name with the password you set in step three.

    Hjalp dette svar dig?

    0 Kunder som kunne bruge dette svar (0 Stem)

    Relaterede artikler

    Mest populære

    How to Install DirectAdmin on CentOS

    DirectAdmin(DA) is a Commercial Hosting Control Panel used to sell shared and reseller hosting...

    How to Install Webmin on Linux

    Webmin is a free hosting control panel with easy installation. It takes only 5 to 10 minutes, and...

    How to Install SolusVM Master on AlmaLinux or CentOS

    SolusVM is a popular VPS hosting control panel. SolusVM master controls Slave nodes (Servers) and...

    How to Install SolusVM Slave on AlmaLinux or CentOS

    SolusVM is a popular VPS hosting control panel, and SolusVM Slave is installed on a dedicated...

    How to Install cPanel

    cPanel is the #1 Hosting Control Panel in the web hosting industry. You can easily install...

    Copyright © 2025 HOPE VALLEY CLOUD. All Rights Reserved.
    Indlæser…
    Indlæser…
    Vælg sprog
    العربية
    Azerbaijani
    Català
    中文
    Hrvatski
    Čeština
    Dansk
    Nederlands
    English
    Estonian
    Persian
    Français
    Deutsch
    עברית
    Magyar
    Italiano
    Macedonian
    Norwegian
    Português
    Português
    Română
    Русский
    Español
    Svenska
    Türkçe
    Українська

    Vælg valuta

    $ USD
    € EUR

    Generate Password

    Please enter a number between 8 and 64 for the password length