Indlæser…
HOPE VALLEY CLOUD logo HOPE VALLEY CLOUD logo HOPE VALLEY CLOUD logo HOPE VALLEY CLOUD logo
Nyheder:
Welcome to Hope Valley!
Dansk
  • العربية
  • Azerbaijani
  • Català
  • 中文
  • Hrvatski
  • Čeština
  • Dansk
  • Nederlands
  • English
  • Estonian
  • Persian
  • Français
  • Deutsch
  • עברית
  • Magyar
  • Italiano
  • Macedonian
  • Norwegian
  • Português
  • Português
  • Română
  • Русский
  • Español
  • Svenska
  • Türkçe
  • Українська
  • 0
    Registrer Konto
    ExtendReduce
    Kundeside
    Store
    Browse All ----- Shared Hosting Registrer et nyt domæne Overfør domæne til os
    Annonceringer Vidensdatabase Netværksstatus Partnere Kontakt os
    Kunde login
    Vidensdatabase
    1. Support
    2. Vidensdatabase
    3. FTP
    4. FileZilla Client
    5. How to Create or Delete a Directory Using FileZilla
    Kategorier
    • Backup/Restore
      4
    • Cloudflare (cPanel)
      9
    • CloudLinux (cPanel)
      10
    • cPanel - Control Panel
      24
    • Databases
      11
    • DirectAdmin
      48
    • DNS - Nameservers
      6
    • Domain Management
      10
    • Email
      17
    • FTP
      9
    • Installing a Control Panel
      6
    • Mail Filters & SPAM
      8
    • Mobile
      11
    • Others
      3
    • PayPal
      7
    • Plesk
      47
    • Security
      10
    • SiteWorx (Control Panel)
      58
    • Softaculous
      69
    • SolusVM
      18
    • SSL
      5
    • Virtualizor
      19
    • WHM
      18
    • WordPress
      17
    Support
    • Mine support sager
    • Annonceringer
    • Vidensdatabase
    • Downloads
    • Netværksstatus
    • Ny Sag
    How to Create or Delete a Directory Using FileZilla
    Print

    You can create or remove a directory on your website using the FileZilla FTP Client.


    1. Open the FileZilla FTP Client.

    2. Enter your FTP host, username, and password. You can use your cPanel username and password as your FTP user and password. Then click on Quick Connect.

    • Enter your domain name in the Host field, such as ftp.example.com or example.com.


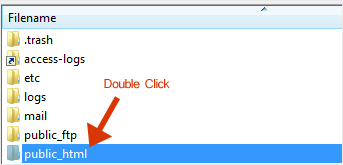
    3. Now, should you wish to create a directory inside the public_html folder, open it by clicking twice on the public_html directory or any other directory where you want to create a new folder.

    4. Right-click on the empty space within the filename box and click on Create Directory in the context menu.
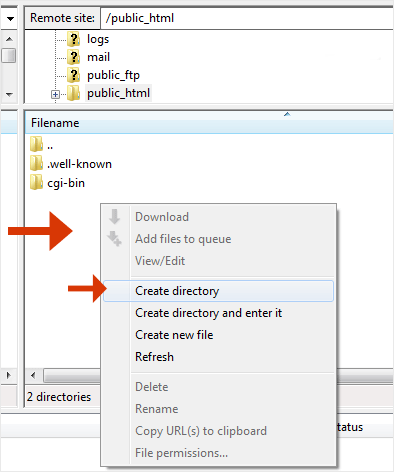

    5. Enter the directory name, such as images or any other directory name you want to create.


    6. Your newly-created directory will appear. Double-click on it to enter your newly-created directory.


    How to Delete or Remove a directory?

    1. Right-click on any directory you wish to delete.

    2. Choose the Delete option in the context menu and then confirm with Yes.
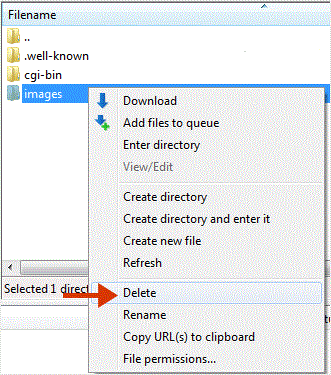

    You can use this method to remove any directory or file.

    Hjalp dette svar dig?

    0 Kunder som kunne bruge dette svar (0 Stem)

    Relaterede artikler

    Mest populære

    How to Install Filezilla Client on Windows

    Installing the FileZilla FTP Client on Windows OS is easy. Just follow this tutorial. 1....

    How to Access or Connect to the FTP via FileZilla

    You can access your FTP Account using the FileZilla FTP Client or any FTP Client. 1. Open the...

    How to Upload the Index File to Your Website via FileZilla

    You can follow this tutorial to upload the files to your hosting account. 1. Open FileZilla FTP...

    How to Download Files and Directories to Your Computer via FileZilla

    You can download files from your website to your computer using the FileZilla Client.1. Open...

    Copyright © 2025 HOPE VALLEY CLOUD. All Rights Reserved.
    Indlæser…
    Indlæser…
    Vælg sprog
    العربية
    Azerbaijani
    Català
    中文
    Hrvatski
    Čeština
    Dansk
    Nederlands
    English
    Estonian
    Persian
    Français
    Deutsch
    עברית
    Magyar
    Italiano
    Macedonian
    Norwegian
    Português
    Português
    Română
    Русский
    Español
    Svenska
    Türkçe
    Українська

    Vælg valuta

    $ USD
    € EUR

    Generate Password

    Please enter a number between 8 and 64 for the password length